Hydraulic Lift Table Handle Modification for moving Pinball Machines
This quick guide aims to help others perform the Harbor Freight Hydraulic Lift Table Handle Modification for moving Pinball Machines. At Harbor Freight, they have a 500LB and 1000LB capacity lift table, each typically made (in China) by Pittsburgh Tools.
 As of January 2023, they’re priced at $249.99 but Harbor Freight offers discount coupons on a regular basis where you can often save 20%-25%. Shipping is around $100 so picking it up locally if you have one is the least expensive way to purchase one.
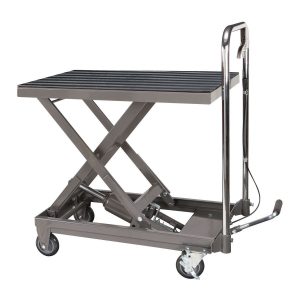
These tables work great for moving pinball machines, except they have one flaw – the handle is straight up and down. As a result, you can’t slide the lift table as far under the center of the game as necessary for the most stable lifting and moving capabilities.
The general consensus suggests the 500LB lift table is much more versatile, convenient, and overall the better choice over the 1000LB lift table. Some of the reasons the 1000LB is less appealing are that it ways considerably more than the 90lb or so weight of the 500LB capacity lift table. Another issue is the 1000LB capacity lift table has a wider table surface so it won’t slide between the legs of certain games as easy, or at all in some cases.
Regardless of which table you choose to modify, the process is the same.
So what is the process?
There are actually many ways to achieve the desired effect of being able to adjust the angle of the handle. Some people just take the handle off and don’t even use it since you can still move the game by maneuvering the game itself while it’s on the lift.
The best lift table handle modification method I’ve seen looks to be the “Bimini” mod. I like this one the best because you can get the exact angle you want on the handle to slide the game all the way under the pinball machine as far back as you want. And when you’re done, you can then fold the handle back down completely flat so it rests on the top of the lift table.
The best part – it takes less than 15 minutes to do this mod, and it only requires a few parts with a total cost coming in under $42 USD.
You can do it even cheaper if you omit the Alloy Seat Post Quick Release Pins, but I wanted something even faster and more convenient than a traditional nut and bolt setup to adjust the angle of the handle. Each Quick Release Pin was around $9, I wasn’t trying to get the best or the cheapest, just something mid-range or so.
The only tool you will need is either a tube cutter or a hacksaw to cut the handle. I went with the tube cutter because I figured it would give me precision, perfect cuts – and it did not disappoint.
Parts Needed:
QTY: 6 – Stainless Steel Washers
QTY: 4 – 1 inch Bimini Top Eye Cap End
QTY: 2 – Alloy Seat Post Quick Release Pin
Steps:
People have said that cutting the first 3.5″ from the bottom of the handle is the sweet spot. I agree. It folds down nicely, and flat, on the surface of the table when it’s in its lowest position.
- With the handle laying flat on the lift table, measure 3.5″ from the bottom of each side of the handle and mark with a thin permanent marker such as a Sharpie.
- Use the tube cutter to cut through the handle on each side.
- Insert each of your 2 sections you cut 3.5″ off from the bottom of the handle into the lift cart and attach using the bolts that came with the lift table with a 14mm wrench or socket.
- Line up 2 pairs of Bimini Top Eye Caps with your washers and Quick Release Pins, then connect it all together and tighten about 75% or so.*You’ll want to place the hardware in the following order: Quick Release Pin end piece, a washer, a Bimini Top Eye Cap, another washer, the other Bimini Top Eye Cap, another washer, and then the Quick Release Pin handle for best results.
** You’ll want both pairs of Bimini Top Eye Caps oriented the same so the handle lines up properly.
*** The Quick Release Pin should be on the outside of the handle on the side of the handle that has the table lift release cable so it’s not obstructed. - Place a Bimini Top Eye Cap on the top of each of those 2 sections of 3.5″ handle you installed in Step 4.
- Affix the Bimini Top Eye Caps more firmly to the 2 handle sections with the provided Allen wrench.
- Slide each side of the top of the handle into your Bimini Top Eye Caps and affix the caps firmly to the handle by tightening the screws with the provided Allen wrench.
- Adjust the tension between your Bimini hinge you just created by changing how tight the Quick Release Pin is screwed into the nut at the end. It may take a little back and forth and trial and error until you get the sweet spot.SUCCESS! Your lift table is now modified and ready to use with greater ease and convenience.